摘要:本文了解了JUC中的AQS抽象类。
环境
Windows 10 企业版 LTSC 21H2
Java 1.8
1 简介
1.1 定义
AQS(AbstractQueuedSynchronizer,抽象的队列同步器)定义了一套多线程访问共享资源的同步器框架,是用来构建锁或者其它同步器组件的重量级基础框架及整个JUC体系的基石。
1.2 抽象
AQS的主要使用方式是继承,子类通过继承同步器并实现它的抽象方法来管理同步状态。
1.3 原理
AQS最重要的组成部分是FIFO队列和state变量,通过FIFO队列来完成资源获取线程的排队工作,通过state整型变量表示持有锁的状态:
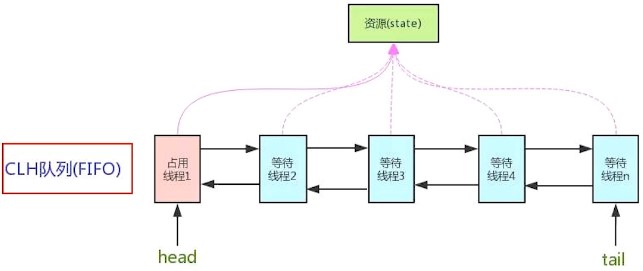
抢到资源的线程直接处理业务逻辑,抢不到资源的线程进入等待队列,这个队列是CLH队列的变体。队列将请求共享资源的线程封装成队列的Node结点,通过CAS自旋以及LockSupport的凭证机制,维护state变量的状态,使并发达到同步的控制效果。
CLH(Craig Landin Hagersten,三个科学家名字)队列的原版是一个单向链表,AQS中的队列是CLH变体的虚拟双向队列FIFO,头节点在初始化后变为空节点。
2 架构
源码:
java1
2
3
4
5
6
7
8
9
10
11
12
13
14
15
16
17
18
19
20
21
22
23
24
25
26
27
28
29
30
31
32
33
34
35
36
37
38
39
40
41
42
43
44
45
46
| public abstract class AbstractQueuedSynchronizer
extends AbstractOwnableSynchronizer
implements java.io.Serializable {
static final class Node {
static final Node SHARED = new Node();
static final Node EXCLUSIVE = null;
static final int CANCELLED = 1;
static final int SIGNAL = -1;
static final int CONDITION = -2;
static final int PROPAGATE = -3;
volatile int waitStatus;
volatile Node prev;
volatile Node next;
volatile Thread thread;
}
private transient volatile Node head;
private transient volatile Node tail;
private volatile int state;
protected final int getState() {
return state;
}
protected final void setState(int newState) {
state = newState;
}
protected final boolean compareAndSetState(int expect, int update) {
return unsafe.compareAndSwapInt(this, stateOffset, expect, update);
}
}
|
AQS使用volatile修饰的state整型变量表示同步状态,通过CLH同步队列来完成线程的排队工作。
对state值的修改是通过CAS完成的,当前线程根据state的值判断能否获取资源。如果获取失败,AQS会将当前线程thread以及等待状态waitStatus等信息封装成Node节点,并将其加CLH入同步队列,同时阻塞当前线程。当state的值变为可获取资源后,会把Node节点中的线程唤醒,再次尝试获取资源。
3 逻辑
3.1 原理
Lock接口的实现类基本都是通过聚合队列同步器的子类完成线程访问控制。
源码:
java1
2
3
4
5
6
7
8
9
10
11
12
13
14
15
16
17
18
19
20
21
22
23
24
25
26
27
28
29
30
31
32
33
34
35
36
37
38
39
40
41
42
43
44
45
46
47
48
49
50
51
52
53
54
55
56
57
58
59
60
61
| public class ReentrantLock implements Lock, java.io.Serializable {
abstract static class Sync extends AbstractQueuedSynchronizer {
final boolean nonfairTryAcquire(int acquires) {
final Thread current = Thread.currentThread();
int c = getState();
if (c == 0) {
if (compareAndSetState(0, acquires)) {
setExclusiveOwnerThread(current);
return true;
}
} else if (current == getExclusiveOwnerThread()) {
int nextc = c + acquires;
if (nextc < 0)
throw new Error("Maximum lock count exceeded");
setState(nextc);
return true;
}
return false;
}
}
static final class NonfairSync extends Sync {
final void lock() {
if (compareAndSetState(0, 1))
setExclusiveOwnerThread(Thread.currentThread());
else
acquire(1);
}
protected final boolean tryAcquire(int acquires) {
return nonfairTryAcquire(acquires);
}
}
static final class FairSync extends Sync {
final void lock() {
acquire(1);
}
protected final boolean tryAcquire(int acquires) {
final Thread current = Thread.currentThread();
int c = getState();
if (c == 0) {
if (!hasQueuedPredecessors() &&
compareAndSetState(0, acquires)) {
setExclusiveOwnerThread(current);
return true;
}
} else if (current == getExclusiveOwnerThread()) {
int nextc = c + acquires;
if (nextc < 0)
throw new Error("Maximum lock count exceeded");
setState(nextc);
return true;
}
return false;
}
}
public ReentrantLock() {
sync = new NonfairSync();
}
public ReentrantLock(boolean fair) {
sync = fair ? new FairSync() : new NonfairSync();
}
}
|
ReentrantLock类的内部聚合了Sync类,Sync类继承自AQS类,并且非公平锁NonfairSync和公平锁FairSync都继承自Sync,默认创建的是非公平锁NonfairSync。
3.2 阶段
整个ReentrantLock的加锁过程,可以分为三个阶段:
- 尝试加锁。
- 加锁失败,线程入队列。
- 线程入队列后,进入阻赛状态。
3.3 举例
三个客户在银行办理业务,使用默认的非公平锁:
java1
2
3
4
5
6
7
8
9
10
11
12
13
14
15
16
17
18
19
20
21
22
23
24
25
26
27
28
29
30
31
32
33
34
35
36
37
38
39
40
41
42
43
44
45
| public static void main(String[] args) {
Lock lock = new ReentrantLock();
new Thread(() -> {
lock.lock();
try {
System.out.println(Thread.currentThread().getName() + "办理业务");
try {
TimeUnit.SECONDS.sleep(10);
} catch (InterruptedException e) {
e.printStackTrace();
}
System.out.println(Thread.currentThread().getName() + "离开");
} finally {
lock.unlock();
}
}, "A").start();
new Thread(() -> {
lock.lock();
try {
System.out.println(Thread.currentThread().getName() + "办理业务");
try {
TimeUnit.SECONDS.sleep(10);
} catch (InterruptedException e) {
e.printStackTrace();
}
System.out.println(Thread.currentThread().getName() + "离开");
} finally {
lock.unlock();
}
}, "B").start();
new Thread(() -> {
lock.lock();
try {
System.out.println(Thread.currentThread().getName() + "办理业务");
try {
TimeUnit.SECONDS.sleep(10);
} catch (InterruptedException e) {
e.printStackTrace();
}
System.out.println(Thread.currentThread().getName() + "离开");
} finally {
lock.unlock();
}
}, "C").start();
}
|
3.4 分析
3.4.1 线程A获取资源
线程A进入,调用lock()方法:
java1
2
3
4
5
6
7
8
9
| final void lock() {
if (compareAndSetState(0, 1))
setExclusiveOwnerThread(Thread.currentThread());
else
acquire(1);
}
|
因为线程A是第一个获取资源的线程,所以获取资源成功,将当前线程设为占用线程,执行业务。
3.4.2 线程B获取资源
线程B进入,调用lock()方法。
因为线程B是第二个获取资源的线程,线程A已经将state从0改为了1,所以使用compareAndSetState()方法设置失败。
3.4.3 线程B抢占资源
线程B获取失败,调用acquire()方法抢占资源:
java1
2
3
4
5
6
7
8
| public final void acquire(int arg) {
if (!tryAcquire(arg) &&
acquireQueued(addWaiter(Node.EXCLUSIVE), arg))
selfInterrupt();
}
|
调用tryAcquire()方法抢占资源:
java1
2
3
4
| protected final boolean tryAcquire(int acquires) {
return nonfairTryAcquire(acquires);
}
|
调用非公平锁的nonfairTryAcquire()方法,返回false表示占用失败:
java1
2
3
4
5
6
7
8
9
10
11
12
13
14
15
16
17
18
19
20
21
22
23
24
25
26
27
| final boolean nonfairTryAcquire(int acquires) {
final Thread current = Thread.currentThread();
int c = getState();
if (c == 0) {
if (compareAndSetState(0, acquires)) {
setExclusiveOwnerThread(current);
return true;
}
} else if (current == getExclusiveOwnerThread()) {
int nextc = c + acquires
if (nextc < 0)
throw new Error("Maximum lock count exceeded");
setState(nextc);
return true;
}
return false;
}
|
因为线程B是第二个获取资源的线程,线程A已经将state从0改为了1,所以使用nonfairTryAcquire()方法占用失败。
3.4.4 线程B等待
线程B抢占失败,调用addWaiter()方法将当前线程加入等待队列:
java1
2
3
4
5
6
7
8
9
10
11
12
13
14
15
16
17
| private Node addWaiter(Node mode) {
Node node = new Node(Thread.currentThread(), mode);
Node pred = tail;
if (pred != null) {
node.prev = pred;
if (compareAndSetTail(pred, node)) {
pred.next = node;
return node;
}
}
enq(node);
return node;
}
|
因为线程B是第一个进入等待的线程,尾节点为空,所以使用enq()方法初始化队列:
java1
2
3
4
5
6
7
8
9
10
11
12
13
14
15
16
17
18
| private Node enq(final Node node) {
for (;;) {
Node t = tail;
if (t == null) {
if (compareAndSetHead(new Node()))
tail = head;
} else {
node.prev = t;
if (compareAndSetTail(t, node)) {
t.next = node;
return t;
}
}
}
}
|
初始化CLH队列后,头节点为空节点,尾节点为当前节点。
3.4.5 线程B阻塞
线程B得到当前节点后,作为参数传入acquireQueued()方法加入CLH队列:
java1
2
3
4
5
6
7
8
9
10
11
12
13
14
15
16
17
18
19
20
21
22
23
24
25
26
27
28
29
30
31
32
33
| final boolean acquireQueued(final Node node, int arg) {
boolean failed = true;
try {
boolean interrupted = false
for (;;) {
final Node p = node.predecessor();
if (p == head && tryAcquire(arg)) {
setHead(node);
p.next = null;
failed = false;
return interrupted;
}
if (shouldParkAfterFailedAcquire(p, node) &&
parkAndCheckInterrupt())
interrupted = true;
}
} finally {
if (failed)
cancelAcquire(node);
}
}
|
因为线程B是第一个进入等待的线程,上一节点为头节点,调用tryAcquire()方法尝试获取资源。获取成功则将当前节点作为头节点并移除上一节点,获取失败则阻塞。
获取资源失败调用shouldParkAfterFailedAcquire()方法处理上一节点:
java1
2
3
4
5
6
7
8
9
10
11
12
13
14
15
16
17
18
19
| private static boolean shouldParkAfterFailedAcquire(Node pred, Node node) {
int ws = pred.waitStatus;
if (ws == Node.SIGNAL)
return true;
if (ws > 0) {
do {
node.prev = pred = pred.prev;
} while (pred.waitStatus > 0);
pred.next = node;
} else {
compareAndSetWaitStatus(pred, ws, Node.SIGNAL);
}
return false;
}
|
因为线程B是第一个进入等待的线程,上一节点为头节点,头节点为空节点,等待状态为0,所以两次进入shouldParkAfterFailedAcquire()方法:
- 第一次进入将上一节点的等待状态设置为-1后返回false,条件判断为false重新进入自旋。
- 第二次进入检测到上一节点的等待状态为-1,返回true,调用
parkAndCheckInterrupt()方法。
调用parkAndCheckInterrupt()方法阻塞当前节点:
java1
2
3
4
5
6
| private final boolean parkAndCheckInterrupt() {
LockSupport.park(this);
return Thread.interrupted();
}
|
3.4.6 线程C获取资源
线程C进入,调用lock()方法。
因为线程C是第三个获取资源的线程,线程A已经将state从0改为了1,所以使用compareAndSetState()方法设置失败。
3.4.7 线程C抢占资源
线程C获取失败,调用acquire()方法抢占资源,源码同上。
调用tryAcquire()方法抢占资源,源码同上。
调用非公平锁的nonfairTryAcquire()方法,返回false表示占用失败,源码同上。
因为线程C是第三个获取资源的线程,线程A已经将state从0改为了1,所以使用nonfairTryAcquire()方法占用失败。
3.4.8 线程C等待
线程C抢占失败,调用addWaiter()方法将当前线程加入等待队列,源码同上。
因为线程C是第二个进入等待的线程,线程B已经完成了队列初始化,尾节点不为空,使用CAS将当前节点作为新的尾节点。
3.4.9 线程C阻塞
线程C得到当前节点后,作为参数传入acquireQueued()方法加入CLH队列,源码同上。
因为线程C是第二个进入等待的线程,上一节点为B节点,B节点不是头节点,不能获取资源。
调用shouldParkAfterFailedAcquire()方法处理上一节点,源码同上。
因为线程C是第二个进入等待的线程,上一节点为B节点,等待状态为-1,返回true,调用parkAndCheckInterrupt()方法。
调用parkAndCheckInterrupt()方法阻塞当前节点,源码同上。
3.4.10 线程A执行完毕
线程A执行完毕,调用unlock()方法:
java1
2
3
| public void unlock() {
sync.release(1);
}
|
调用release()方法:
java1
2
3
4
5
6
7
8
9
10
11
12
13
14
| public final boolean release(int arg) {
if (tryRelease(arg)) {
Node h = head;
if (h != null && h.waitStatus != 0)
unparkSuccessor(h);
return true;
}
return false;
}
|
3.4.11 线程A释放资源
调用tryRelease()方法释放资源:
java1
2
3
4
5
6
7
8
9
10
11
12
13
14
15
16
17
18
| protected final boolean tryRelease(int releases) {
int c = getState() - releases;
if (Thread.currentThread() != getExclusiveOwnerThread())
throw new IllegalMonitorStateException();
boolean free = false
if (c == 0) {
free = true;
setExclusiveOwnerThread(null);
}
setState(c);
return free;
}
|
3.4.12 线程A唤醒线程
线程B和线程C已经进入等待队列,调用unparkSuccessor()方法唤醒线程:
java1
2
3
4
5
6
7
8
9
10
11
12
13
14
15
16
17
18
19
20
| private void unparkSuccessor(Node node) {
int ws = node.waitStatus;
if (ws < 0)
compareAndSetWaitStatus(node, ws, 0);
Node s = node.next;
if (s == null || s.waitStatus > 0) {
s = null;
for (Node t = tail; t != null && t != node; t = t.prev)
if (t.waitStatus <= 0)
s = t;
}
if (s != null)
LockSupport.unpark(s.thread);
}
|
头节点的下一节点为B节点,线程B被唤醒。
3.4.13 线程B抢占资源
线程B在parkAndCheckInterrupt()方法中被唤醒后,返回中断状态为false,重新进入自旋。
线程B的上一节点为头节点,进入tryAcquire()方法抢占资源。
抢占资源成功后,将当前线程设为占用线程,将当前节点设为头节点,同时解除同线程B的绑定,执行业务。
3.4.14 线程B执行完毕
线程B执行完毕,调用unlock()方法释放资源并唤醒线程。
头节点的下一节点为C节点,线程C被唤醒。
3.4.15 线程C抢占资源
线程C在parkAndCheckInterrupt()方法中被唤醒后,返回中断状态为false,重新进入自旋。
线程C的上一节点为头节点,进入tryAcquire()方法抢占资源。
抢占资源成功后,将当前线程设为占用线程,将当前节点设为头节点,同时解除同线程C的绑定,执行业务。
3.4.16 线程C执行完毕
线程B执行完毕,调用unlock()方法释放资源并唤醒线程。
头节点的下一节点为空,不会有任何线程被唤醒。
4 公平锁与非公平锁
4.1 非公平锁
非公平锁在资源可用时不会判断当前队列是否有线程在等待,刚加入的线程可以与被唤醒的线程一起竞争资源。
源码:
java1
2
3
4
5
6
7
8
9
10
11
12
13
14
15
16
17
18
19
20
21
22
23
24
25
26
27
28
29
30
31
| final void lock() {
if (compareAndSetState(0, 1))
setExclusiveOwnerThread(Thread.currentThread());
else
acquire(1);
}
public final void acquire(int arg) {
if (!tryAcquire(arg) &&
acquireQueued(addWaiter(Node.EXCLUSIVE), arg))
selfInterrupt();
}
protected final boolean tryAcquire(int acquires) {
return nonfairTryAcquire(acquires);
}
final boolean nonfairTryAcquire(int acquires) {
final Thread current = Thread.currentThread();
int c = getState();
if (c == 0) {
if (compareAndSetState(0, acquires)) {
setExclusiveOwnerThread(current);
return true;
}
} else if (current == getExclusiveOwnerThread()) {
int nextc = c + acquires;
if (nextc < 0)
throw new Error("Maximum lock count exceeded");
setState(nextc);
return true;
}
return false;
}
|
4.2 公平锁
公平锁在资源可用时会判断当前队列是否有线程在等待,刚加入的线程不可以与被唤醒的线程一起竞争资源。
源码:
java1
2
3
4
5
6
7
8
9
10
11
12
13
14
15
16
17
18
19
20
21
22
23
24
25
26
| final void lock() {
acquire(1);
}
public final void acquire(int arg) {
if (!tryAcquire(arg) &&
acquireQueued(addWaiter(Node.EXCLUSIVE), arg))
selfInterrupt();
}
protected final boolean tryAcquire(int acquires) {
final Thread current = Thread.currentThread();
int c = getState();
if (c == 0) {
if (!hasQueuedPredecessors() &&
compareAndSetState(0, acquires)) {
setExclusiveOwnerThread(current);
return true;
}
} else if (current == getExclusiveOwnerThread()) {
int nextc = c + acquires;
if (nextc < 0)
throw new Error("Maximum lock count exceeded");
setState(nextc);
return true;
}
return false;
}
|
在tryAcquire()方法中使用hasQueuedPredecessors()方法判断等待队列中是否存在有效节点:
- 返回false表示没有,取反后为true表示当前节点不需要排队,需要执行占用资源的操作。
- 返回true表示有,取反后为false表示当前节点需要排队,需要执行加入等待队列的操作。
源码:
java1
2
3
4
5
6
7
| public final boolean hasQueuedPredecessors() {
Node t = tail;
Node h = head;
Node s;
return h != t &&
((s = h.next) == null || s.thread != Thread.currentThread());
}
|
说明:
- 判断头节点和尾节点是否相同,如果相同,说明队列未初始化或者当前队列只有一个空节点,返回false,取反后为true,尝试占用资源。
- 判断头节点和尾节点是否相同,如果不相同,说明存在两个不同节点。
- 继续判断下一节点是否为空节点,如果成立,说明下一节点为空,可能上个线程刚刚将头节点初始化,尚未给尾节点赋值,返回true,取反后为false,需要排队。
- 继续判断下一节点是否为空节点,如果不成立,说明下一节点不为空。
- 继续判断下一节点封装的线程是否不等于当前线程,如果成立,说明下一线程不为当前线程,返回true,取反后为false,需要排队。
- 继续判断下一节点封装的线程是否不等于当前线程,如果不成立,说明下一线程为当前线程,返回false,取反后为true,尝试占用资源。
5 自定义同步器
5.1 实现方法
不同的自定义同步器争用共享资源的方式也不同,自定义同步器在实现时只需要实现共享资源state的获取与释放即可,至于具体线程等待队列的维护(如获取资源失败入队和唤醒出队等),AQS已经在底层实现好了。
自定义同步器实现时主要实现以下几种方法:
- isHeldExclusively():该线程是否正在独占资源。只有用到condition才需要去实现它。
- tryAcquire(int):独占方式。尝试获取资源,成功则返回true,失败则返回false。
- tryRelease(int):独占方式。尝试释放资源,成功则返回true,失败则返回false。
- tryAcquireShared(int):共享方式。尝试获取资源。负数表示失败;0表示成功,但没有剩余可用资源;正数表示成功,且有剩余资源。
- tryReleaseShared(int):共享方式。尝试释放资源,如果释放后允许唤醒后续等待结点返回true,否则返回false。
一般来说,自定义同步器要么是独占方法,要么是共享方式,他们也只需实现tryAcquire-tryRelease和tryAcquireShared-tryReleaseShared中的一种即可。但AQS也支持自定义同步器同时实现独占和共享两种方式,如ReentrantReadWriteLock。
5.2 举例说明
以ReentrantLock为例,state初始化为0,表示未锁定状态。
线程A调用lock()方法获取资源,同时调用tryAcquire()占用资源,并将state的值加1。
其他线程再调用tryAcquire()方法占用资源就会失败,直到线程A调用unlock()方法释放资源,并将state的值减0,其它线程才有机会获取该锁。
在释放锁之前,A线程可以重复获取资源,state的值会累加,这就是可重入锁。获取多少次就要释放多少次,这样才能保证state最后的值是0。
条